Building an agentic team can be daunting but does not need to be. Microsoft’s Multi-Agent Tool AutoGen received a significant update with 0.4. After installing the platform you may ask yourself how to add a new model to the workflow designer.
This article covers the specific challenge of adding more OpenAI models in AutoGen0.4. How do you add more OpenAI models beyond the starter one? This article assumes you are not modifying the original AutoGen code and only using the AutoGen Studio. You will need mild comfort in editing json. Let's walk thru this step by step.
The AutoGen missing OpenAI model problem
You are wanting to use a different model other than the out of the box OpenAI model provided in this screenshot. OpenAI has several models available and for this article I assume you are familiar with most of them. While at any time you can reference the full list of models at OpenAI, I provide some common ones below. For our purposes today we will be working to add the ChatGPT Turbo-3.5 model.
A list of OpenAI models
gpt-4o
gpt-4o-mini
chatgpt-4o-latest
o1
o1-mini
o1-preview
This is not an exhaustive list of all models. It is a list of the models that OpenAI considers "current" as of the time of writing this article. This guide will add an unlisted model to guide by example that you can enable autogen to use openAI models. Even the historical ones.
Navigating to the Gallery
You do need a little passing familarity with the Gallery. I won't be covering the full Component Gallery in deep detail in this article. Follow me for more insight into AutoGen.
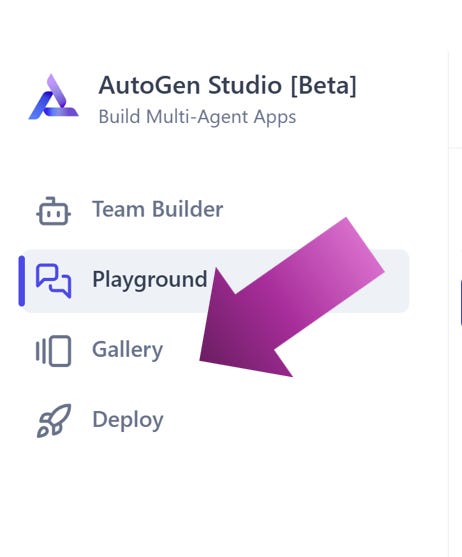
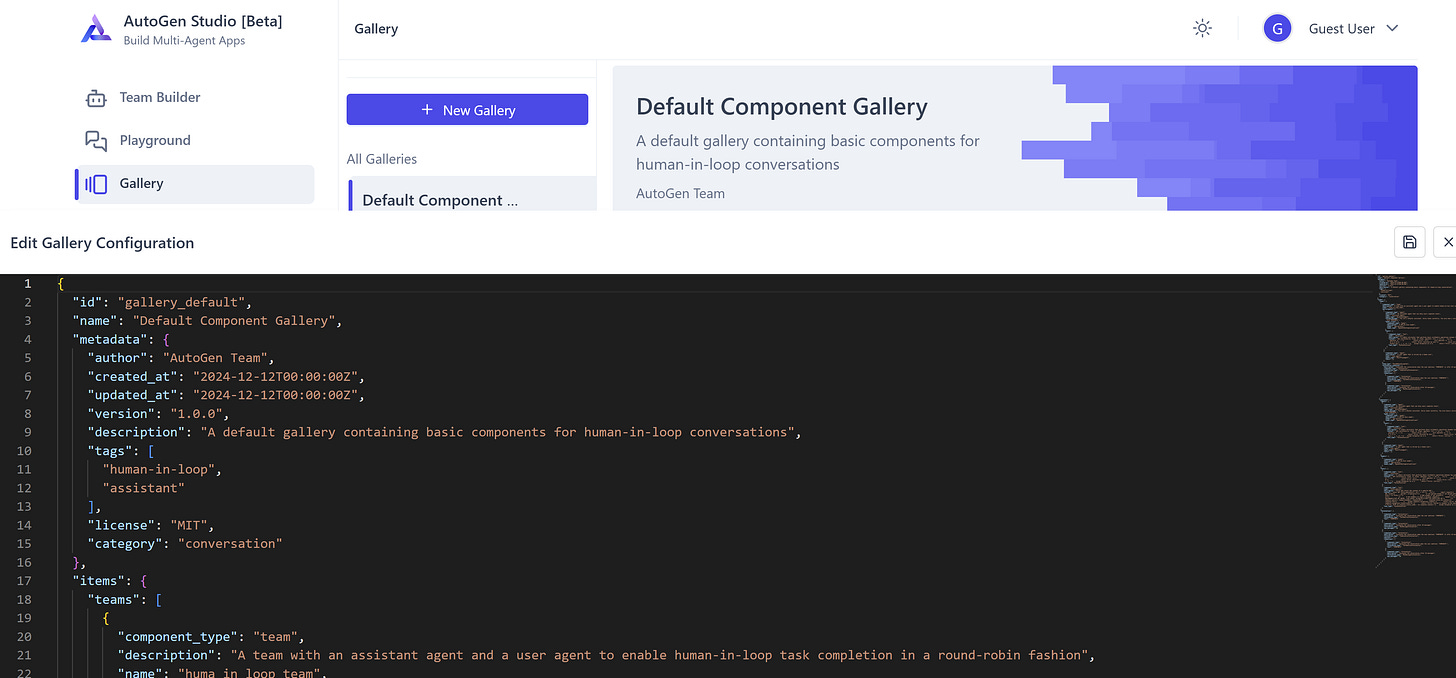
In this tutorial it is important to know how to navigate to the gallery. When you have AutoGen Studio open, click on the 'Gallery' link and then you will see this screen.
Our goal today is to add one or more of OpenAI's other models to the AutoGen studio. In the remainder of this article you will learn how to add the ChatGPT Turbo 3.5 model. A little light code editing gets you there. As mentioned earlier, you do need a little familiarity with JSON.
How to add more OpenAI models to AutoGen
Adding one or more OpenAI models to AutoGen sounds like a difficult project. In reality the entire process will take you less than two minutes. To make this even easier and provide you a simple reference for the future I have here the list of steps needed.
Quick Guide
If these are a little mysterious then worry not. Here are the steps that I will walk you through. I provide the summary here to make it easy in the future.
In the component gallery edit the "models" component
The models list is a json array. Find the relevant section and add an extra item(s) for the models you want to use.
Save your changed and cascade any updates to your agentic team
Step by Step
Follow along and let's add a model that started it all: the turbo-3.5 model. While deprecated the model is a good example of how to make use of both old and new models. There may be a time where you want to make use of a model that OpenAI does not have listed and the same steps will work.
The model we are adding is gpt-3.5-turbo
Let’s bring this historic model to AutoGen0.4.
Step 1. Navigating the component gallery to edit the models list
With the AutoGen Agent Studio open click on the left navigation where it says "Gallery". This will then open a page where you will see a list of galleries, including the ability to make new ones. You can ignore that for today. We are laser focused on adding one model to your list in AutoGen for your agent team to work with.
Click the 'Gallery' and then scroll to the Default Component. This article assumes you are starting from a new AutoGen installation.
With the Default Component selected now find the edit button on the far right of the screen. Click the “Edit” button and proceed to the next step.
Step 2. Editing the models list and adding your custom json
With the editor open you will see a sprawl of text, brackets, quotes and more. This is the json familiarity that I mentioned earlier is a useful thing to have. Fear not. Json is easy to work with and all we need to do is add a few new lines of it.
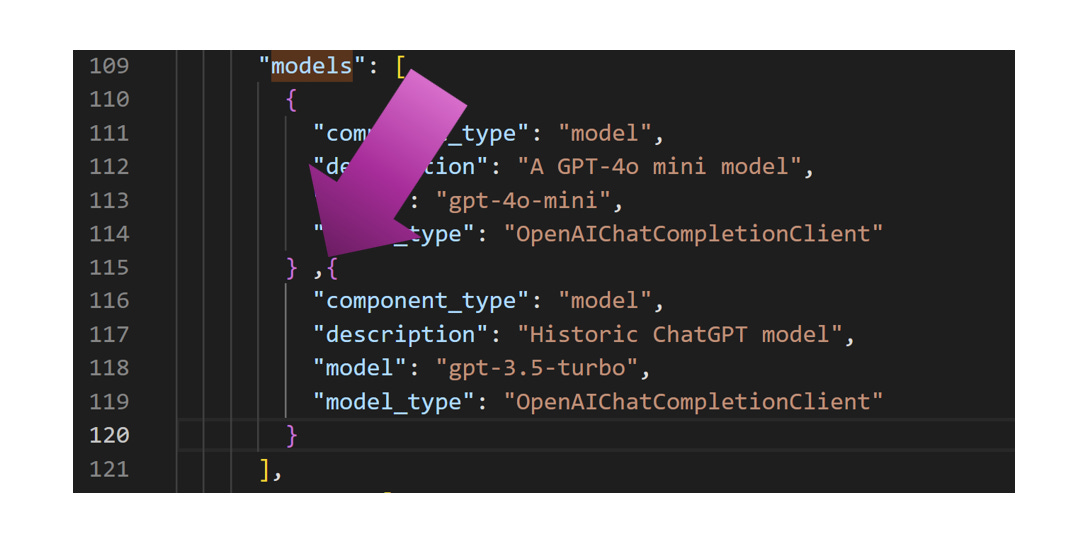
Scroll down the file and see if you can find the phrase "models" in quotes. On windows, if you click in the json area and press “ctrl+f” you can open a mini search tool to find this value.
This is a json array structure. What "models" means is that you can place your OpenAI Chat Completion models into this specific place. If you want to add more than one then repeat the process you will now perform. The bold elements of the code block you can change. Modify the text to be any OpenAI model from the list provided earlier.
Code:
        ,{
          "component_type": "model",
          "description": "Historic ChatGPT model",
          "model": "gpt-3.5-turbo",
          "model_type": "OpenAIChatCompletionClient"
        }
Copy the above code and paste it after the closing space indicated in the image. Doing this extends the json array by one. Note the comma. I included the comma to make it easy to paste this JSON into place.
Verify before continuing that you have the same json structure as shown in this example. Refer to the troubleshooting tips at the end of this article if you need further help. If you're stumped, add a comment or send me a message and we can figure it out together.
Step 3. Save the entry and update your team
Once you add and save the json from the prior step you are almost done. The next step depends on how you structured the team. Team construction is beyond the scope of this article. But, it is important to see the full change in action so let's go see where you can find your added model. When loading to edit your team you should see the newly added model in the list like so. Congratulations!
But wait, there’s more.
Save copies of your components.
⚠️There is data loss risk.
If AutoGen Studio crashes or fails to start your file edits may disappear from the gallery. A simple solution to this problem is to maintain manual backups. When you edit a file copy those contents to a trusted location and keep them accessible. Remember that this is a "preview" technology and so a little extra precautions are always in order.
Congratulations!
Following the three steps means you added you took your first step into a new world. The world multi-agent workflows. This article provided the little details that you might not have expected.
I write about engineering and executive topics. I encourage you to subscribe to this substack and we can navigate AI together.
ℹ️Troubleshooting
”Team creation failed: Model creation failed: model_info is required when model name is not a valid OpenAI model”
If you see this error it means you either have lost access or typed in a bogus entry. Most likely you typed in the model name wrong. If you lost access to the model (or never had it), you can check out the platform of OpenAI.
The question then becomes what specific steps need to occur next. There are two steps that I recommend. First we need to double check the entry in the component gallery. Inisde the gallery confirm that your json is the same model name as the official OpenAI platform. Click save.
Next you need to also update your team. This is because you changed the component but it is possible the team setup is invalid. Edit your team and ensure that the model assigned to your agent is using the correct model. If not, you might experience the problem of "I changed the autogen model but it didn't save". That's addressed next.
I changed the model in the component gallery but my team session still doesn't work.
Changing a model component does not cascade the change everywhere. The way this version of AutoGen works is that the component gallery is a template factory. Templates copy each component into your team session. This means you need to also edit the model name in the edit tool of the team component.
If you found me while troubleshooting your AutoGen setup then I welcome you to my little corner on the internet. Consider subscribing or tapping that 💖icon if you are reading this on the substack mobile application.


(how) can a local custom model be added as well?